
A lot of people think they don’t have the skills to build their own Little Free Library book exchange, and don’t have the funds to buy one; maybe you’ve thought that yourself a time or two.
After all, so many talented people have built wildly creative Little Libraries that seem like they belong in a museum or fancy gallery instead of on a street corner. It’s easy to get intimated, or to think that you need detailed Library building plans and lots of building experience before you try your hand at it.
But that’s not true! Every day we see cute, thoughtful Little Library designs that didn’t break the bank and required little-to-no assembly.
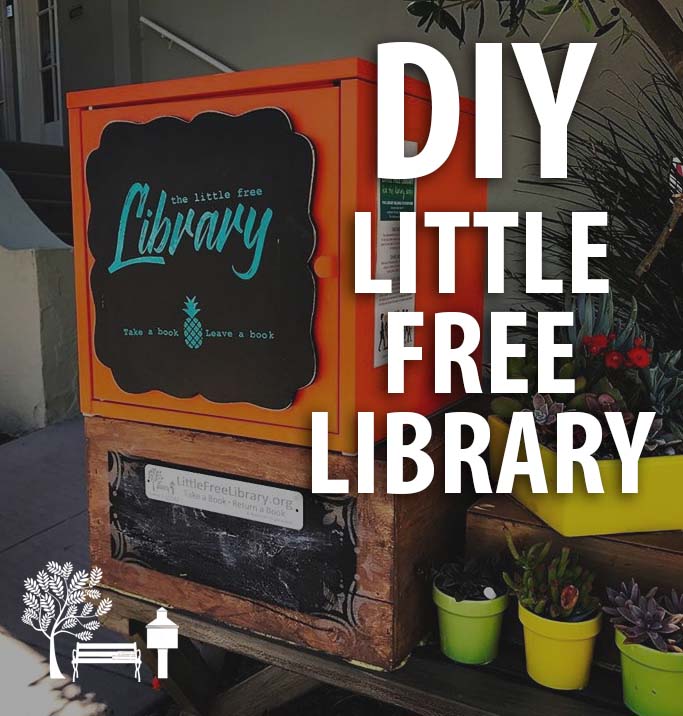
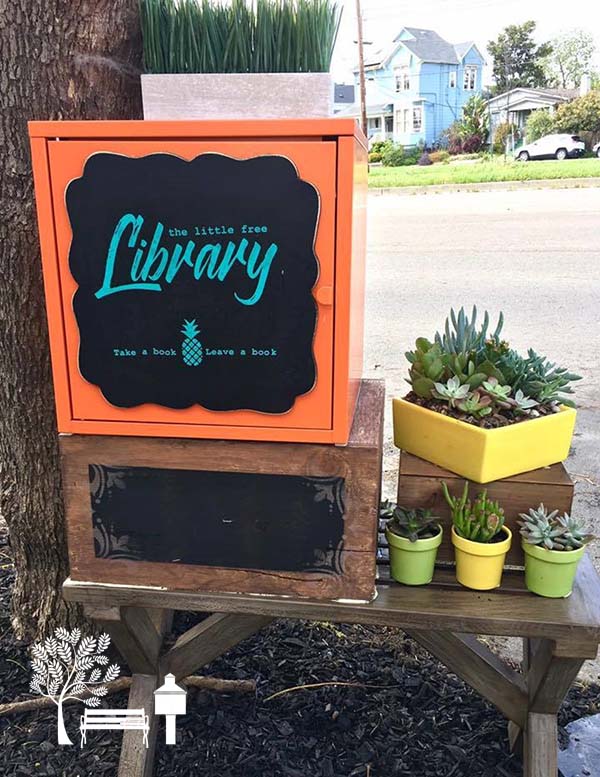
Take Little Free Library steward Iliana Morton, for example. Her Library #53342 in Oakland, California (pictured above) is a transformed IKEA metal cabinet cube that cost her $25, and the result is a bright, cute, cost-effective Library!
Now, you’re probably thinking that you’re not one of those crafty people like you see all over Pinterest, and that yours would never turn out this good. That’s why we asked Iliana to share exactly how she created her DIY Little Free Library. Read on to learn how you can do it, too!
“I’ve known that I’ve wanted to have a Little Free Library for years … about a year after purchasing our first home, I was excited to set up our own Little Free Library. I knew that I wanted something bright and colorful. I also was unsure about investing a lot of money into the project, not knowing how well it would hold up in our neighborhood … I decided to take a DIY approach to keep my costs down, while giving me an opportunity to figure out what would and wouldn’t work for us,” Iliana said.
How did she make the Library?
She started by purchasing a $25 bright orange IKEA metal cabinet cube. She chose it because it was sturdy, and she knew she could spray-paint the metal later on if she wanted to decorate it further.
To make her fledgling Library sturdier, she used Gorilla Glue (available at hardware stores for around $3) to seal together the pieces as she assembled the box. She made sure to get the glue to seep into the seams on all sides of the box, making those edges water-resistant. If you happen to have polyurethane caulk on-hand, you may be able to use caulk to seal the edges of the box, too.
For extra protection, Iliana applied liquid cement on the interior seams of the box. It didn’t look very pretty, so she then covered the interior edges with some duct tape with fun, bright designs that she found at Office Depot for about $2 per roll.
“On the front door I affixed a faux-chalkboard shape that I got at Michaels. With a 40% off Michael’s coupon, the sign was just $2.50. I do have a Cricut machine, which is what I used to design and cut the vinyl lettering that is on the chalkboard. Once the vinyl was on, I sprayed a clear coat of spray sealant on it to waterproof it,” she said.
If you don’t want to deal with vinyl lettering, consider using chalkboard markers instead to write on your sign.
Now, what about installation?
“My Library box sits on a plain wood bench that we found on Craigslist for free! I found a wooden crate and used that as a riser for my Library so that it sat at a nicer level for people to reach into. I actually affixed the crate to the bench with Gorilla Glue, and then affixed the Library to the crate in the same way. I did this to prevent the box from accidentally (or purposefully) falling down.”
In addition to Craigslist, Freecycle.org is a good place to look for free items in your neighborhood!
The rest was just a matter of decoration! Iliana found some small pots for plants and succulents which she placed near her Library. She used Gorilla Glue again to adhere the pots to the bench, so that they didn’t “magically disappear” or fall over.
So when all was said and done, how much did it cost?
“I probably spent around $50 on this. My biggest expense was the box at $25. The rest was a matter of keeping an eye out and finding a deal on what I needed. I used absolutely no tools beyond the screwdriver I needed to put together the IKEA box. I took an easy approach by using gorilla glue, which has been wonderful so far, as it is super durable and waterproof. I’ve gotten so many compliments from neighbors that they enjoy it because of the brightness it adds!”
There you have it! You can DIY your own Little Free Library book box for $50 or less.
There’s one more important step that we should mention here: register your Library! When you register, you get access to all of the benefits of registration that we offer to Library stewards, like a listing on our world map and the use of the name Little Free Library.
For more ways that you can create your own cute, affordable Little Library, check out Little Free Libraries on a Shoestring Budget. And get the basics on how to start your own Little Library, register, and get it on the world map.