
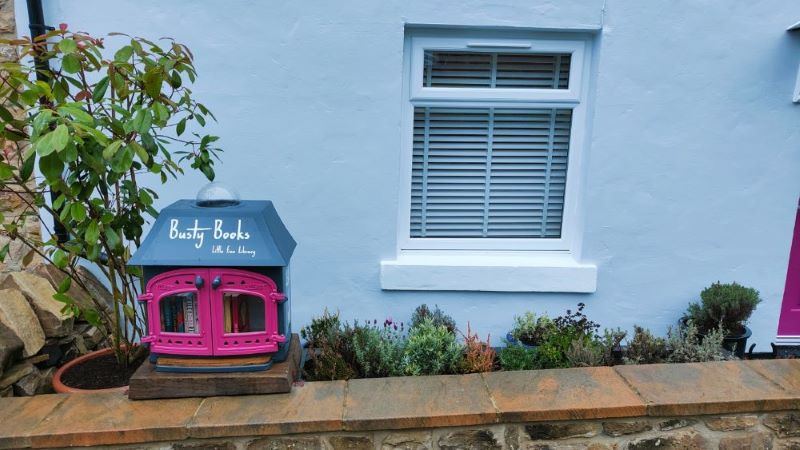
Busty Books #139777, named for its home on Busty Bank in Newcastle upon Tyne (not its contents), was installed by Rachel and Paul Pattinson to share their excess books and give back to their neighborhood— find it on the Little Free Library world map! This quaint and creative Little Free Library is made from a repurposed wood burning stove. This post walks you through the inspiration and build process behind Busty Books Little Free Library step by step.
What inspired you to start a Little Free Library?
Rachel: I am an avid reader and former librarian. Books have been really important to my wellbeing throughout the COVID-19 pandemic, but it’s been much harder to get hold of second-hand books and pass on books I’ve read. We moved into a new house recently, and there isn’t a library in the village so I suddenly thought that it would be a great idea to host a Little Free Library for our community!
Paul: Where we had moved to, which is semi-rural, we had quite a few walkers passing our house and with a friendly neighborhood, we both thought it would be nice to “give something back.” With access to charity shops restricted owing to COVID, we had amassed quite a lot of books that Rachel was looking to find a home–or should I say, I was desperate for her to find a home!–so I also jumped at the idea of creating our own library!
What has surprised you the most since starting a little library?
Rachel: We didn’t really know how people would react, so we’re really pleased with the response! I see lots of people using the library regularly, and books circulating. And I’m just reading my second book that I took out of the library so there are definitely benefits for me as a reader, too.
One thing that surprised me is the response I’ve had when posting about the library online. I’ve been sharing updates with our community Facebook group, and about the launch of our Little Free Library on Twitter and LinkedIn. Some interesting things have happened because of that. Firstly, we found out that there used to be a library at the top of our street that closed many years ago! Also, I posted online about leaving some “blind date with a book” gifts in the library for valentines day, and we received a lovely and unexpected valentines gift from someone in the village thanking us for the Little Free Library.
What was the process to create your Little Free Library?
See a full materials list and diagram of the finished library at the end of the article.
Paul: When Rachel asked me to consider building one, I immediately thought about using wood, but knowing the small strip of garden to the front of our house where it would have to be placed, I wanted to keep it low profile and slim.
At first I was going to repurpose an old, galvanized water tank but then the idea of an effective door becomes tricky, especially whilst trying to keep it looking aesthetically pleasing.
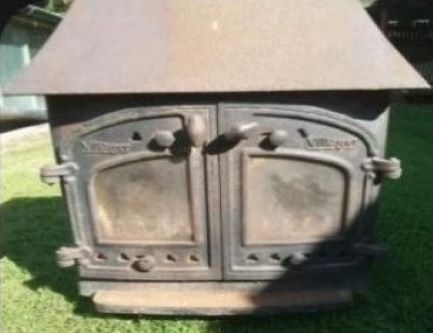
I then had the brainwave of an old wood burner knowing that these had the doors “readymade” – the difficulty was then making it watertight, but I knew I’d find a way. Before I knew it, I was scouring eBay and Gumtree. I didn’t want a separate opening for the ashtray, and I didn’t want one with a really tall chimney. This narrowed what was available quite a bit which helped as of the 000’s available, only low 00’s were of interest, and I happened to land upon one that fit the bill.
Prepping the stove
Rachel and Paul’s first concern was safety. He completely stripped the wood burning stove, removing the sliding vents, fixings/hardware, glass, grill, and fire bricks. He also took a grinder to the inside to remove some metal lugs that were sticking out.
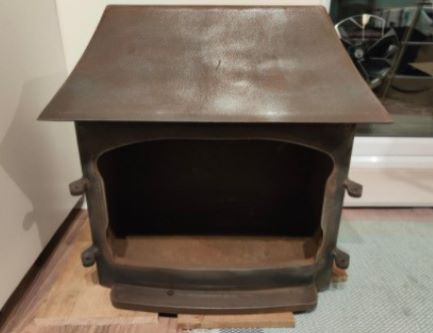
Next, Paul sanded the stove. He removed as much rust as possible before cleaning it with a solvent solution to degrease the surface and get it ready to paint. “This was one heck of a task but made easier when I got myself a rotary sander,” says Paul. “I should have done this in the first place! I always knew this stage would be the hardest part in many ways.”
Once clean, Paul painted the inside of the stove with Hammerite oil-based silver, direct-to-rust metal paint with a hammered finish to cover the pitted surface– 3 coats in total.
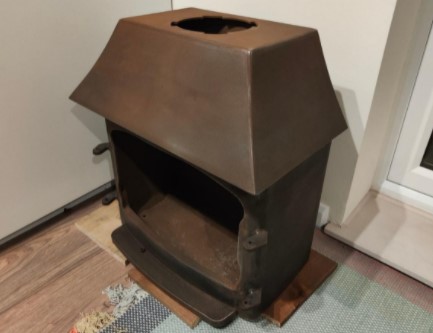
He then painted the outside with 3 coats of Hammerite Ultima water-based dark grey, direct-to-rust metal paint to cover all of the bare metal and provide a weather resistant finish as much as possible.

Waterproofing
One of Rachel and Paul’s main objectives was to keep water out and let light in.
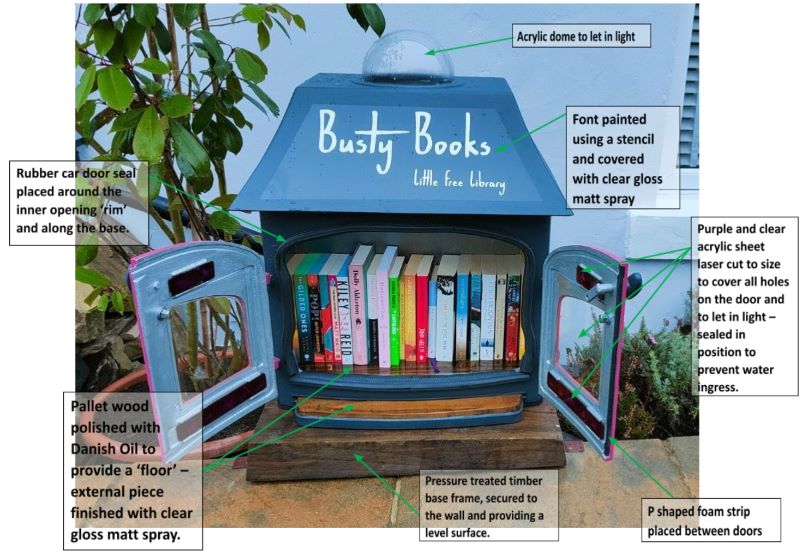
For the doors, Rachel laser cut some clear and purple UV-resistant acrylic sheets to the precise size and glued them into position in the door. Then, he went around the outside edges with a clear sealant to prevent water ingress.
“Knowing I wanted to get some additional light into it, I ordered a circular acrylic dome and flat sheet to cover the original vent holes on the top and at the rear,” shares Paul. “ Before sealing in position, I sprayed with a clear UV resistant spray to help prevent tarnishing over time, then painted around the outer edges to blend in with the dark grey colour.”
The biggest challenge at this stage was figuring out how to make the doors watertight in driving rain. Paul decided to use a car door seal strip, which he molded to the needed shape around the opening of the doors. When compressed, the strip sits tight against the doors to minimize water entry.
To attach the rubber seal along the bottom, Paul delicately stripped the metal out from the seal itself, opening it to a 90-degree angle before gluing it against the base.
Paul used the leftover seal around the base of the library, so it is sitting on rubber. This will protect the library’s painted surface from becoming damaged and corroded.
Finally, he ran a “P” shaped piece of foam strip (typically bought to stop draughts around doors) down the middle between the doors, making the seal as watertight as possible when the doors are pulled tight against the surface.
Painting the doors
Rachel and Paul wanted the library’s doors to match the color of their front door.
After painting the outside with the dark grey direct-to-rust metal paint and the inside with the silver to provide corrosion protection, Paul covered the doors in a couple coats of Non-Isocyanate Acrylic Topcoat Aerosol from Cromdex (Akzo Nobel) – giving the doors their vibrant color!
Finishing touches
Another priority was ensuring minimal corrosion from the hinge fixings. Paul recommends using marine-grade stainless-steel components from Accu; “I’d used them before for a number of bespoke low volume things and they were very good,” says Paul. Although inevitable in an external environment, this will minimize any opportunities for rust, making the finished cast-iron library low maintenance and durable for years to come.
Paul used the stainless-steel hardware on the lower door hinges and glued them into position to prevent them being tampered with. “Sadly I couldn’t use them in the top hole as they wouldn’t quite keep the door plum, so I had to use the original hinge pins – as a result, this is one of the areas where corrosion is more likely to happen, along with the area around the handle but I’ll deal with this as and when it gets too noticeable!” explains Paul.
Lettering
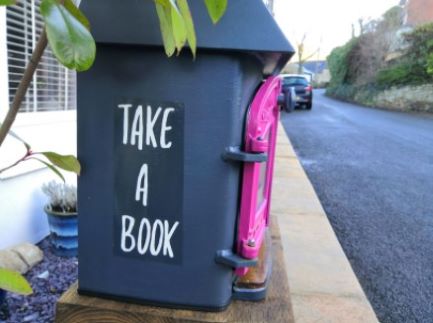
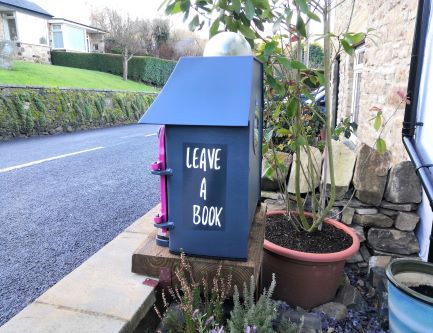
After deciding on a font with Paul, Rachel used a Circut Joy Machine to cut out letter templates for “Take a book, leave a Book,” “Busty Books,” and “Little Free Library.” They infilled the templates with white metal paint.
To ensure the lettering lasts, Paul sprayed the library with the UV resistant gloss matt spray.
Wooden Base
“The finishing touch was a wooden base on the inside library and a wooden batten across the front edge – the latter was to fill what would have been a recess and allowed water to pool,” says Paul.
To achieve this, Paul found a few offcuts of pallet wood, shaped them to size, sanded them down, and then used a Danish Oil to polish them and provide some resistance to moisture.
“Just in case water did get inside, I didn’t want the wooden boards sitting in water so I raised them with some plastic washers so they wouldn’t sit proud – this also lifted them further away from the heads of the screws I used to bolt it down with, just in case the recess I made wasn’t deep enough!”
Knowing it would be subject to the weather, Paul also coated the wooden piece on the outside of the library with the clear glass matt UV resistant spray mentioned earlier.
Mounting the Library
The final step was creating a “stand” for the library to sit level on their sloped garden wall.
Paul cut some pressure-treated timber offcuts to the desired size before staining it with brown creocote to further protect the wood from the weather. Next, he secured the frame to the wall with some small brackets.
Once in place, he used heavy-duty security headed fixings to screw the library into the frame. He inserted through the burner’s “leg holes,” making sure that the boards over the screw holes were recessed to prevent the screw heads from fouling the wood. The ingenuity of this means that no fixings are visible from the inside, yet they can be removed if needed
“This provided a solid method of attachment and HOPEFULLY means that if anyone does come and try and steal it, they will have quite a job doing so. It also means that there is no chance of it toppling over as combined, the burner weighs a significant amount and I didn’t wish to crush an unsuspecting visitor!”
On a final note, Paul discloses, “Despite all the time and effort put into it, one of the hardest things was indeed the manual handling as it was VERY HEAVY – this improved when stripped back being just about do-able, but really, it should have been a two person lift at times. If anyone does decide to follow in my footsteps, do ask for help!”
Here is the complete list of materials Rachel and Paul used to revitalize the wood burning stove:
- Villager wood burning stove- £120
- Rotary sander
- Metal-cleaning solvent solution
- Hammerite oil-based silver, direct-to-rust metal paint- £14 a tin
- Hammerite Ultima water-based dark grey, direct-to-rust metal paint- £25 a tin
- Clear and purple UV-resistant acrylic sheets
- Clear Perspex Acrylic Plastic Dome with Flange (175 mm) £15.95
- Clear Perspex Acrylic Circle Round Discs (200 mm, 3mm)- £6.69
- Plastikote Clear Sealer Spray (400 ml Gloss Matt Satin UV Weather Paint)- £9.25
- Car Door Rubber Seal Strip- £7.98
- 5M/10M Rubber Seal Weather Strip Foam Stick Tape Door Window Draught Excluder- £4.99
- Two Pack Non-Isocyanate Acrylic Topcoat Aerosol from Cromdex (Akzo Nobel)
- Marine-grade stainless-steel components from Accu
- Danish Oil-£14.00
- Circut Joy Machine
- White metal paint
- Pallet wood and pressure-treated timber offcuts
- Brown creocote
Learn how you can start a Little Free Library for your neighborhood!